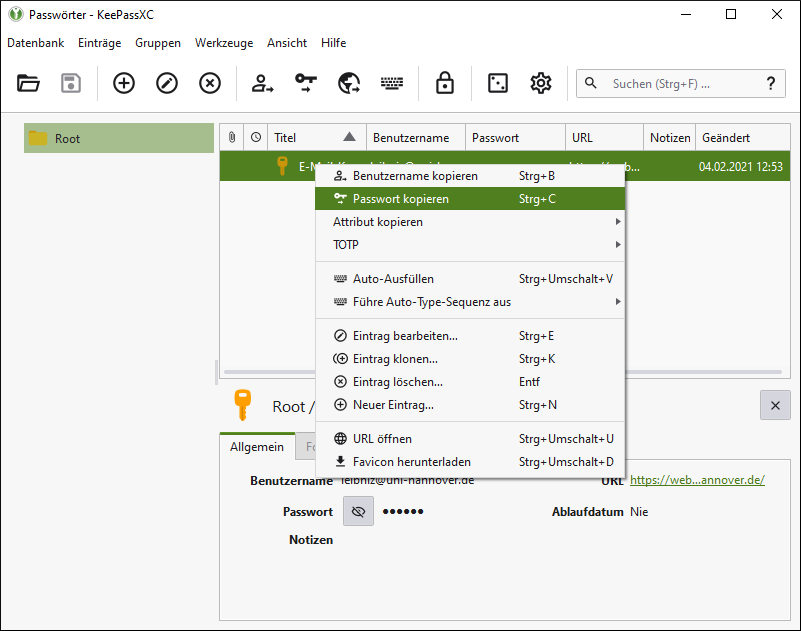
Step-by-step instructions for setting up KeePassXC

These instructions contain the most important steps for an initial setup. Detailed instructions can be found on the manufacturer's website.
Instructions: KeePassXC Browser Addon

After the installation, you will see the start page of the KeePassXC database. A new database must now be created for the initial setup. After the installation, you will see the start page of the KeePassXC database. A new database must now be created for the initial setup. After the installation, you will see the start page of the KeePassXC database. A new database must now be created for the initial setup.
After the installation, you will see the start page of the KeePassXC database. A new database must now be created for the initial setup.
The database is named, optionally a description can also be formulated. The database is named, optionally a description can also be formulated. The database is named, optionally a description can also be formulated.
The database is named, optionally a description can also be formulated.
The encryption settings can be adjusted. To get started, the default settings are recommended at this point. The encryption settings can be adjusted. To get started, the default settings are recommended at this point. The encryption settings can be adjusted. To get started, the default settings are recommended at this point.
The encryption settings can be adjusted. To get started, the default settings are recommended at this point.
Now the password for the database must be selected. The password is used to unlock the database and is the only password that needs to be remembered. It should be sufficiently complex and kept in a safe place (no post-it on the screen!). To choose the password, use the integrated password generator, which is opened via the cube symbol to the right of the input field. Now the password for the database must be selected. The password is used to unlock the database and is the only password that needs to be remembered. It should be sufficiently complex and kept in a safe place (no post-it on the screen!). To choose the password, use the integrated password generator, which is opened via the cube symbol to the right of the input field. Now the password for the database must be selected. The password is used to unlock the database and is the only password that needs to be remembered. It should be sufficiently complex and kept in a safe place (no post-it on the screen!). To choose the password, use the integrated password generator, which is opened via the cube symbol to the right of the input field.
Now the password for the database must be selected. The password is used to unlock the database and is the only password that needs to be remembered. It should be sufficiently complex and kept in a safe place (no post-it on the screen!). To choose the password, use the integrated password generator, which is opened via the cube symbol to the right of the input field.
A password is generated, the length and character types can be varied. The entropy and the green bar indicate how secure the password is. Only use passwords that generate a green bar and the password quality "Excellent". Write down the password and keep it in a safe place (again: no Post-It on the screen!). Use "Apply Password" to set the created password as the password for the database. A password is generated, the length and character types can be varied. The entropy and the green bar indicate how secure the password is. Only use passwords that generate a green bar and the password quality "Excellent". Write down the password and keep it in a safe place (again: no Post-It on the screen!). Use "Apply Password" to set the created password as the password for the database. A password is generated, the length and character types can be varied. The entropy and the green bar indicate how secure the password is. Only use passwords that generate a green bar and the password quality "Excellent". Write down the password and keep it in a safe place (again: no Post-It on the screen!). Use "Apply Password" to set the created password as the password for the database.
A password is generated, the length and character types can be varied. The entropy and the green bar indicate how secure the password is. Only use passwords that generate a green bar and the password quality "Excellent". Write down the password and keep it in a safe place (again: no Post-It on the screen!). Use "Apply Password" to set the created password as the password for the database.
The database is created with the generated password. Optionally, the database can be additionally protected, e.g. by a key file (YubiKey support is also offered). The database is created with the generated password. Optionally, the database can be additionally protected, e.g. by a key file (YubiKey support is also offered). The database is created with the generated password. Optionally, the database can be additionally protected, e.g. by a key file (YubiKey support is also offered).
The database is created with the generated password. Optionally, the database can be additionally protected, e.g. by a key file (YubiKey support is also offered).
The database can now be decrypted with the master password. (Optionally also with a key file or a hardware key if this has been selected beforehand). The database can now be decrypted with the master password. (Optionally also with a key file or a hardware key if this has been selected beforehand). The database can now be decrypted with the master password. (Optionally also with a key file or a hardware key if this has been selected beforehand).
The database can now be decrypted with the primary password. (Optionally also with a key file or a hardware key if this has been selected beforehand).
An entry can now be created via the + symbol. This is done here using the example of a mail account. The URL (which should point to the login page of the respective service) is necessary in combination with the browser add-on. The password generator can also be used here. An entry can now be created via the + symbol. This is done here using the example of a mail account. The URL (which should point to the login page of the respective service) is necessary in combination with the browser add-on. The password generator can also be used here. An entry can now be created via the + symbol. This is done here using the example of a mail account. The URL (which should point to the login page of the respective service) is necessary in combination with the browser add-on. The password generator can also be used here.
An entry can now be created via the + symbol. This is done here using the example of a mail account. The URL (which should point to the login page of the respective service) is necessary in combination with the browser add-on. The password generator can also be used here.
After the entry has been created, it can be found in the overview. After the entry has been created, it can be found in the overview. After the entry has been created, it can be found in the overview.
After the entry has been created, it can be found in the overview.
The password can now be copied to the clipboard and pasted at the desired location by selecting the entry with CTRL+C or right-click - Copy password. For comfortable use in the browser, the KeePassXC browser add-on can be used at this point. The linked instructions can be found at the top of this page. The password can now be copied to the clipboard and pasted at the desired location by selecting the entry with CTRL+C or right-click - Copy password. For comfortable use in the browser, the KeePassXC browser add-on can be used at this point. The linked instructions can be found at the top of this page. The password can now be copied to the clipboard and pasted at the desired location by selecting the entry with CTRL+C or right-click - Copy password. For comfortable use in the browser, the KeePassXC browser add-on can be used at this point. The linked instructions can be found at the top of this page.
The password can now be copied to the clipboard and pasted at the desired location by selecting the entry with CTRL+C or right-click - Copy password. For comfortable use in the browser, the KeePassXC browser add-on can be used at this point. The linked instructions can be found at the top of this page.

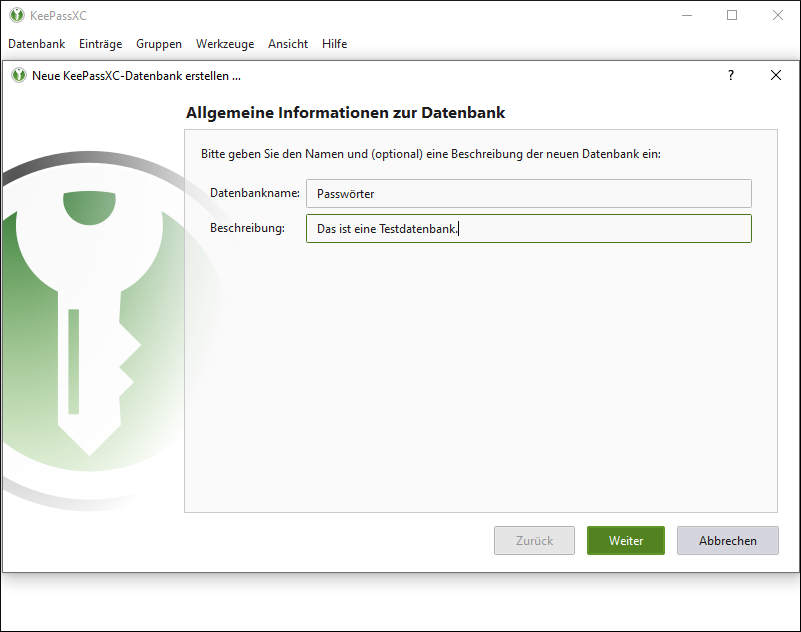
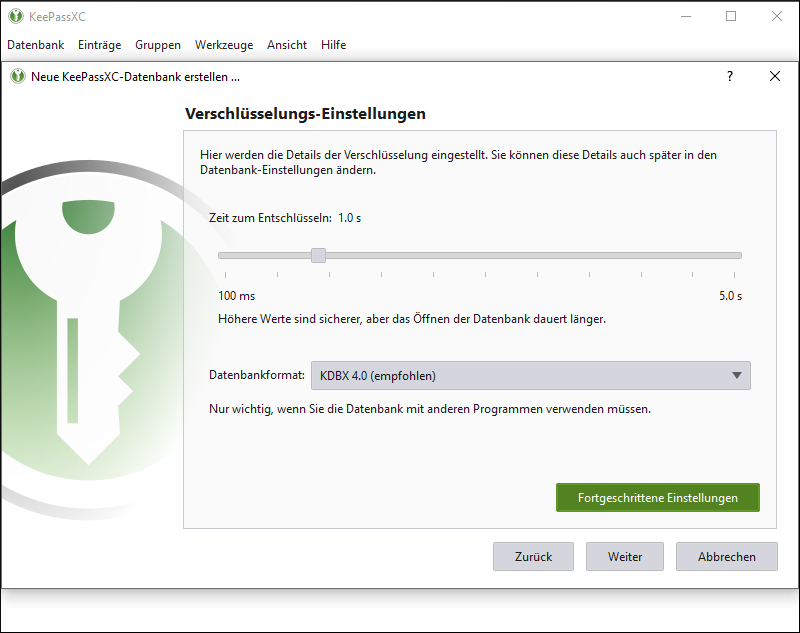
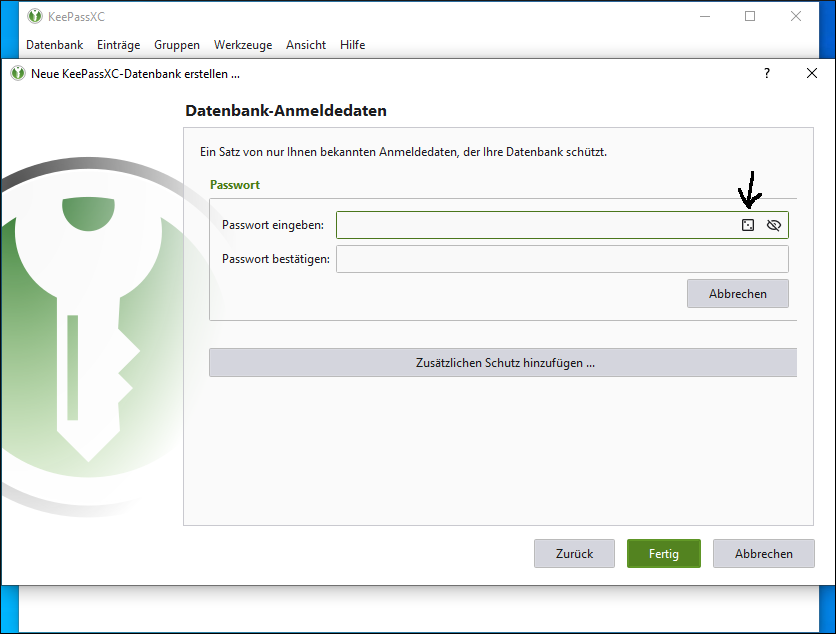
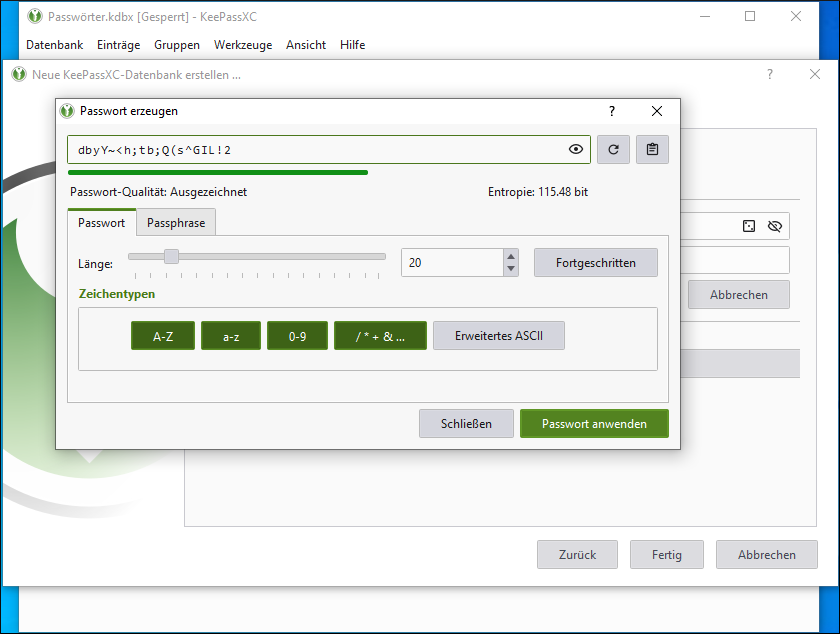
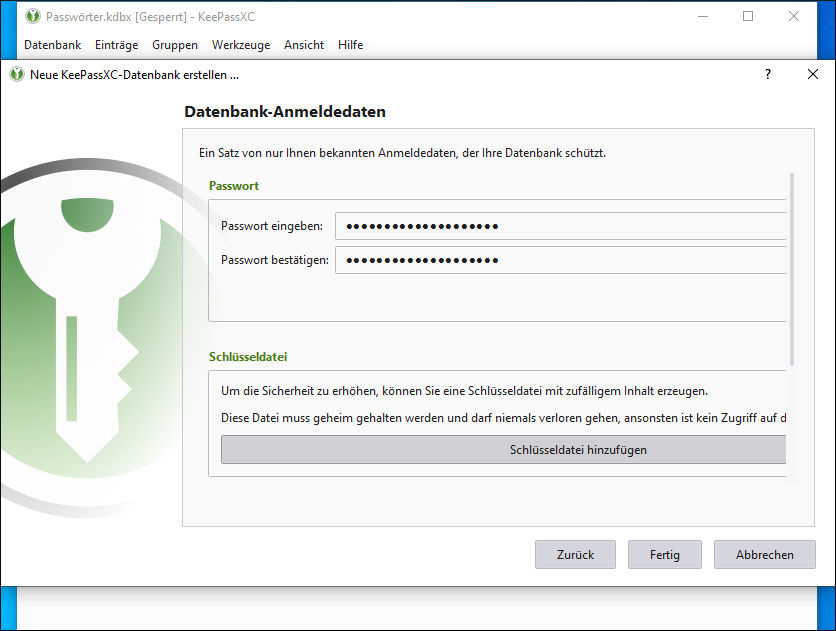
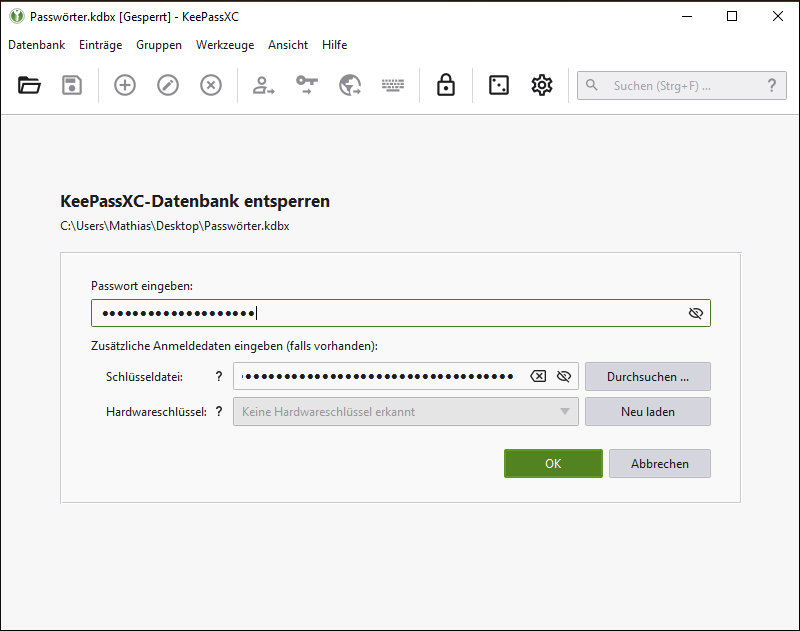
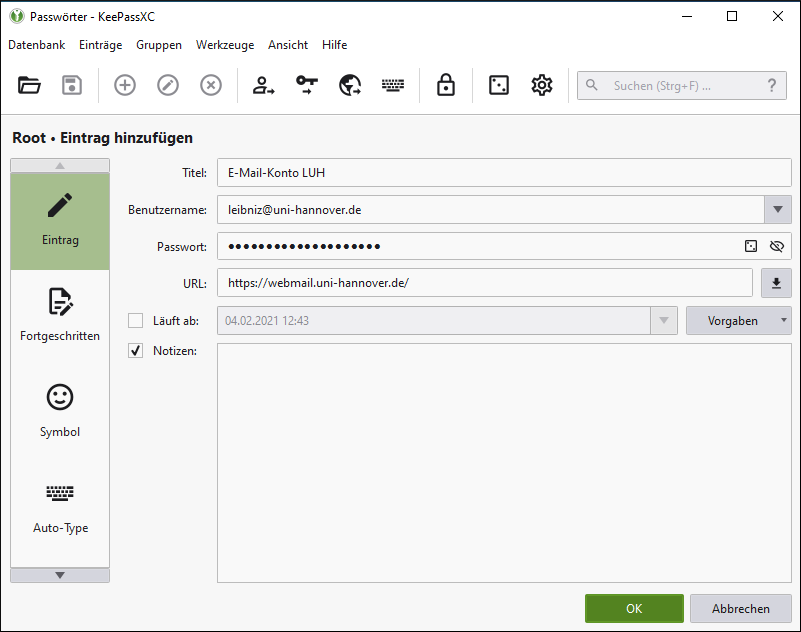
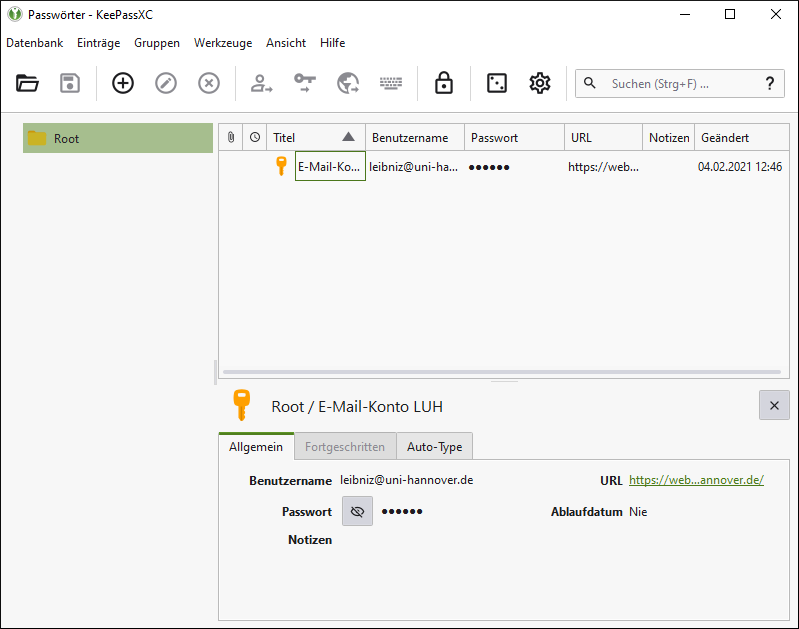
Note: The instructions were created with KeePassXC 2.6.4.

Contact

IT Security
Security team
IT Security
Security team