PGP can be used, for example, to send encrypted e-mails to people outside the university (for comparison: S/MIME certificates (also called "user certificates" at LUH) are only suitable for this use case to a limited extent, since it is assumed that the other party also has or can apply for an S/MIME certificate - which is often not the case). Since every person can create a PGP key, it is basically possible for all communication partners to communicate in encrypted form. On this page the necessary steps are explained and presented.
Tutorial: PGP usage using Thunderbird as an example
-
Requirement 1: Set main password
![In Thunderbird, open the Burger menu (also called the three-dash menu) at the top right.]()
![In Thunderbird, open the Burger menu (also called the three-dash menu) at the top right.]()
![In Thunderbird, open the Burger menu (also called the three-dash menu) at the top right.]()
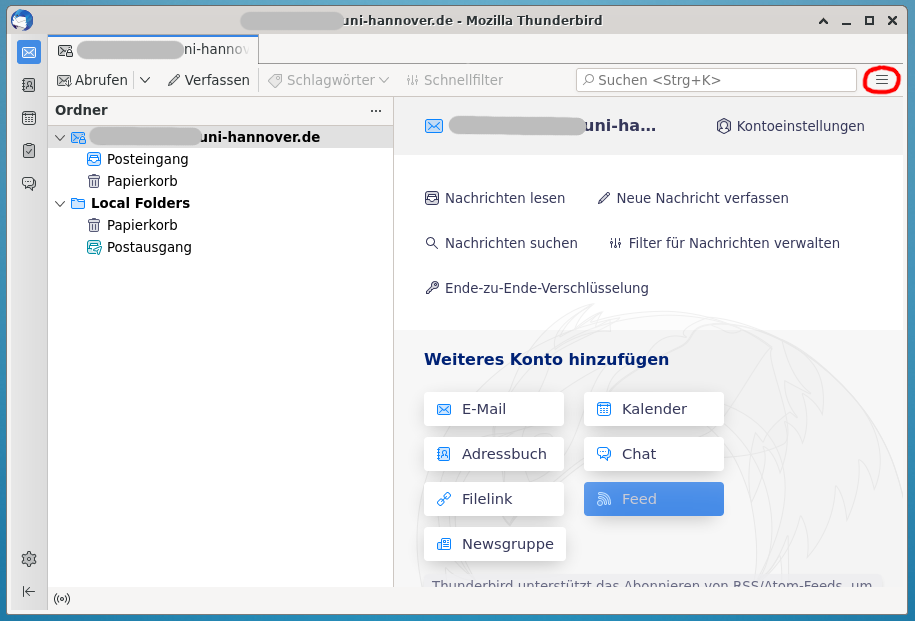
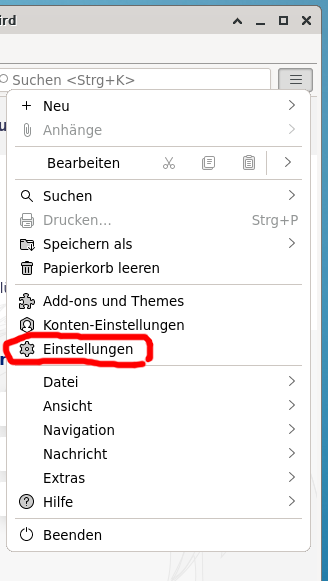
In Thunderbird, open the Burger menu (also called the three-dash menu) at the top right. ![Click on "Settings" there.]()
![Click on "Settings" there.]()
![Click on "Settings" there.]()
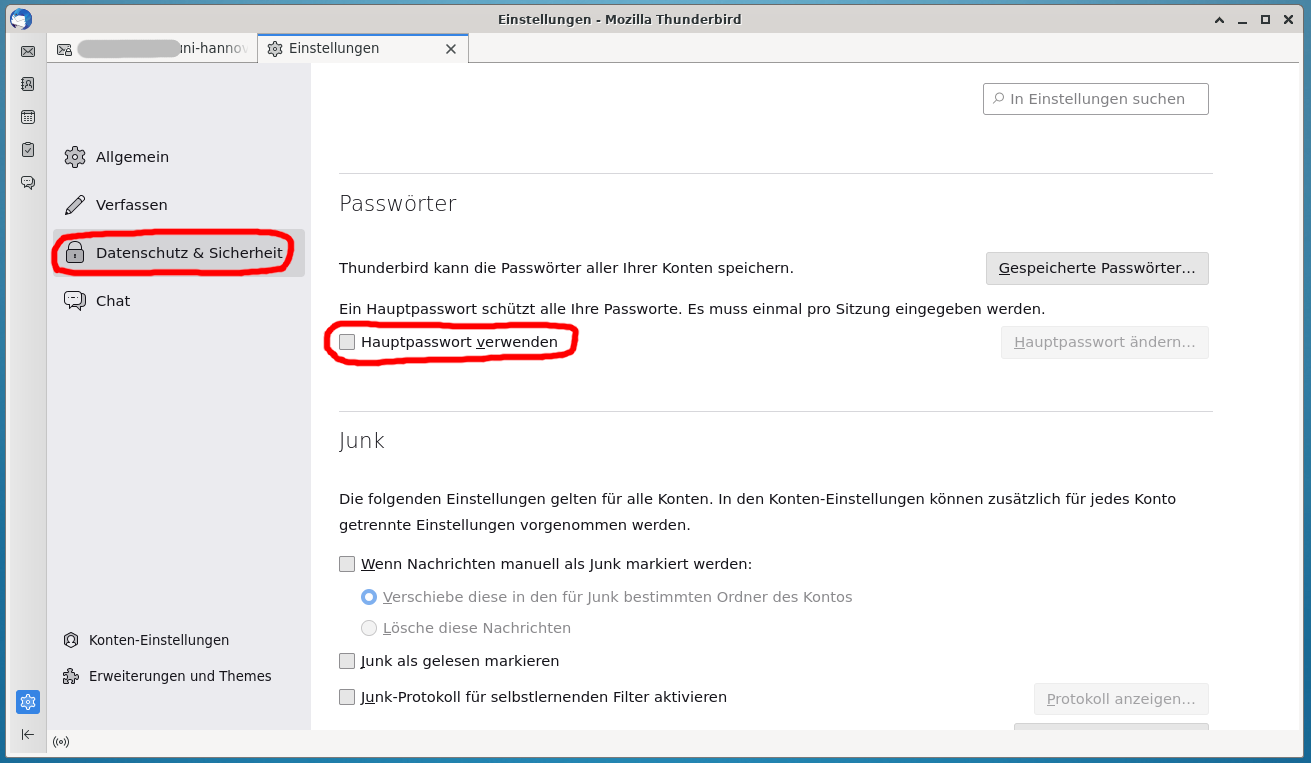
Click on "Settings" there. ![Open the "Privacy and security" tab. Check the box "Use main password".]()
![Open the "Privacy and security" tab. Check the box "Use main password".]()
![Open the "Privacy and security" tab. Check the box "Use main password".]()
Open the "Privacy and security" tab. Check the box "Use main password". ![Then enter a main password that is as secure as possible. This will be used to encrypt your PGP secret keys and will also be used to secure your email passwords. It is important to remember it well, as you will not be able to retrieve, send or decrypt any emails without it. It is best to store it in a well-secured password manager like KeepassXC.]()
![Then enter a main password that is as secure as possible. This will be used to encrypt your PGP secret keys and will also be used to secure your email passwords. It is important to remember it well, as you will not be able to retrieve, send or decrypt any emails without it. It is best to store it in a well-secured password manager like KeepassXC.]()
![Then enter a main password that is as secure as possible. This will be used to encrypt your PGP secret keys and will also be used to secure your email passwords. It is important to remember it well, as you will not be able to retrieve, send or decrypt any emails without it. It is best to store it in a well-secured password manager like KeepassXC.]()
Then enter a main password that is as secure as possible. This will be used to encrypt your PGP secret keys and will also be used to secure your email passwords. It is important to remember it well, as you will not be able to retrieve, send or decrypt any emails without it. It is best to store it in a well-secured password manager like KeepassXC. -
Requirement 2: Create PGP key
![Click the top line of the account you want to use to send mail encrypted with PGP. Then click "End-to-end encryption".]()
![Click the top line of the account you want to use to send mail encrypted with PGP. Then click "End-to-end encryption".]()
![Click the top line of the account you want to use to send mail encrypted with PGP. Then click "End-to-end encryption".]()
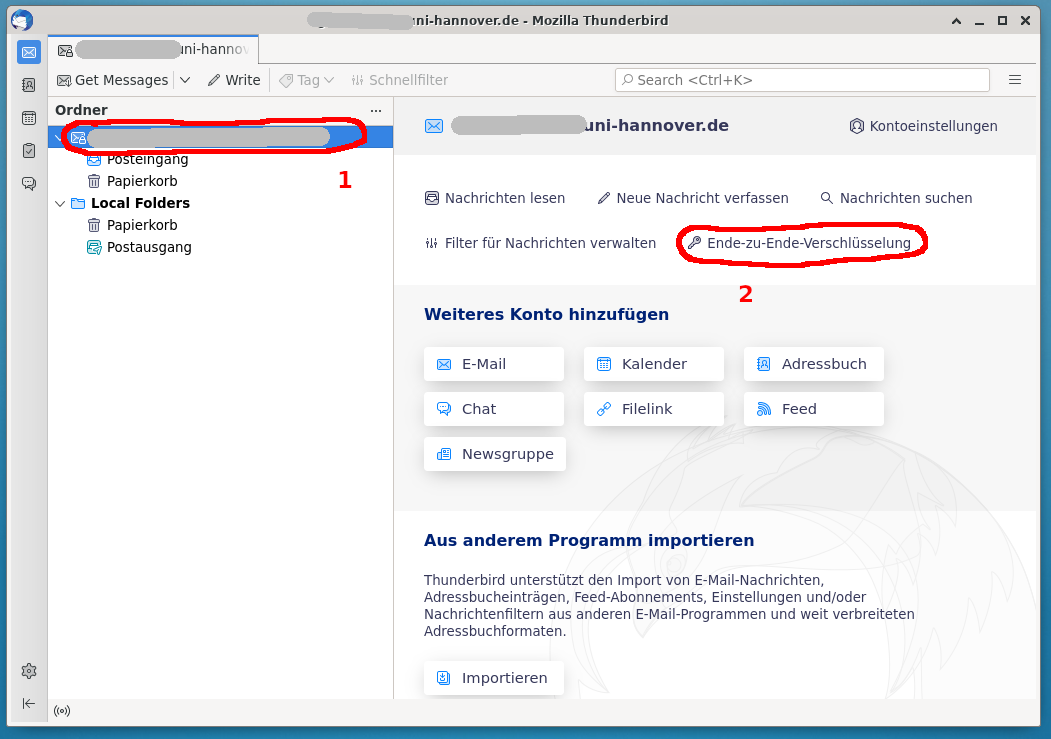
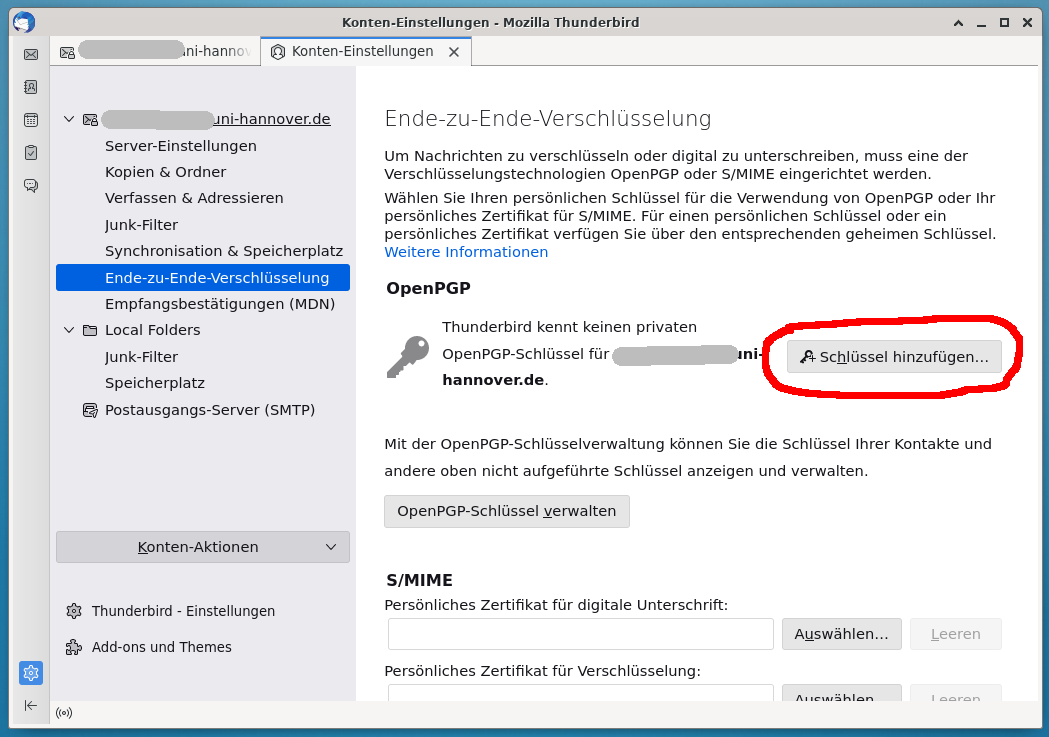
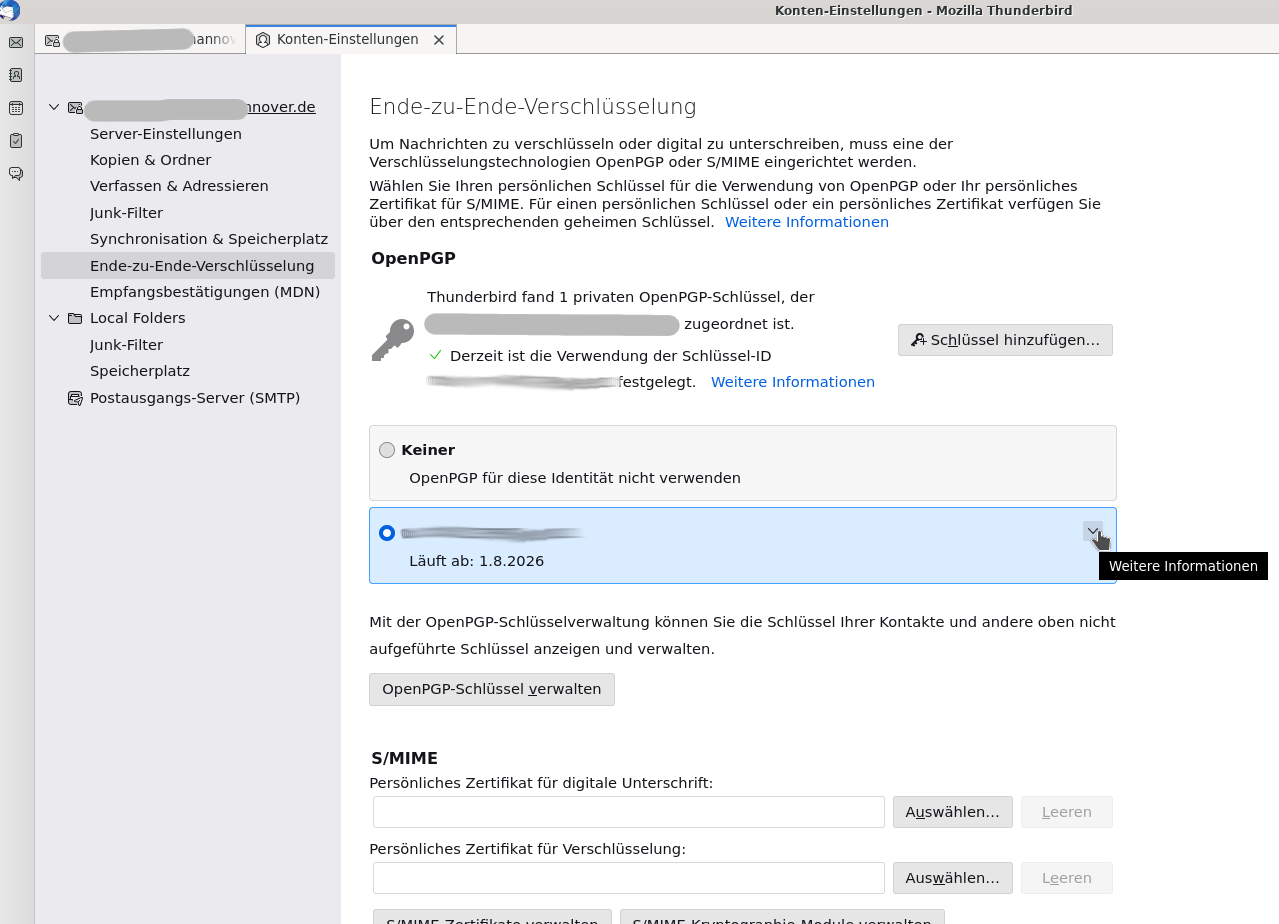
Click the top line of the account you want to use to send mail encrypted with PGP. Then click "End-to-end encryption". ![Now select "Add key" under OpenPGP.]()
![Now select "Add key" under OpenPGP.]()
![Now select "Add key" under OpenPGP.]()
Now select "Add key" under OpenPGP. ![As long as you have not already created a PGP key on another device for your email account, select "Create new OpenPGP key".]()
![As long as you have not already created a PGP key on another device for your email account, select "Create new OpenPGP key".]()
![As long as you have not already created a PGP key on another device for your email account, select "Create new OpenPGP key".]()
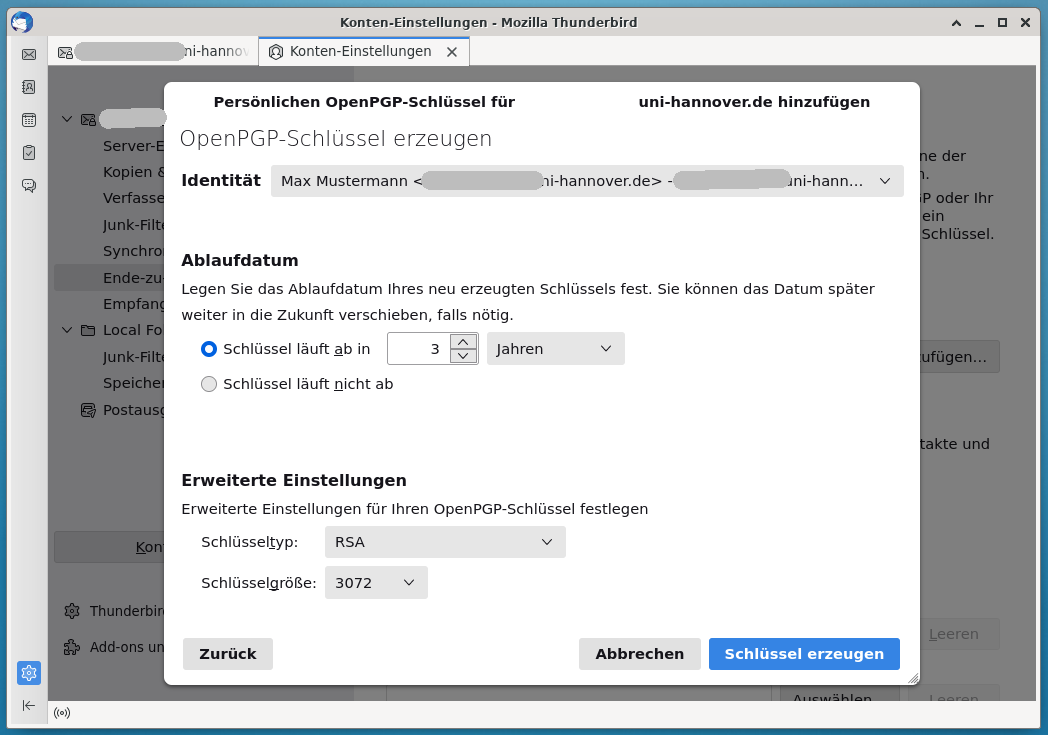
As long as you have not already created a PGP key on another device for your email account, select "Create new OpenPGP key". ![Select the desired settings here. If you do not know what to choose, you can use the default values.]()
![Select the desired settings here. If you do not know what to choose, you can use the default values.]()
![Select the desired settings here. If you do not know what to choose, you can use the default values.]()
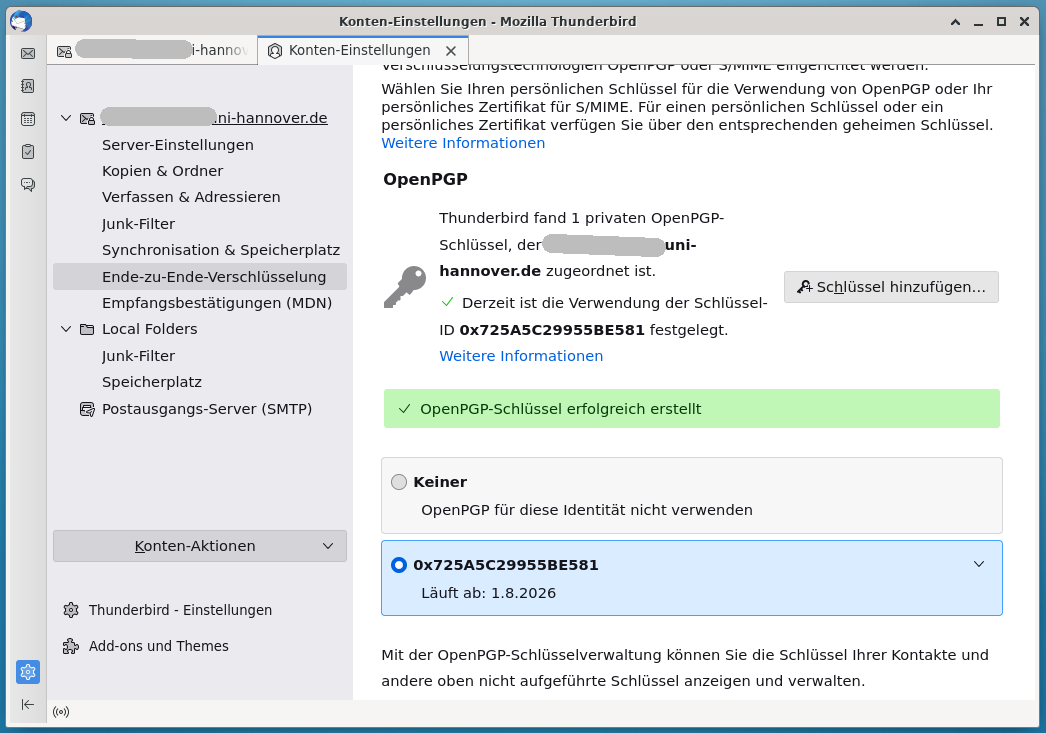
Select the desired settings here. If you do not know what to choose, you can use the default values. ![If at the end in the settings your new PGP key is listed as well as its ID, the creation has worked. You now have the necessary key material to send mails with PGP encryption.]()
![If at the end in the settings your new PGP key is listed as well as its ID, the creation has worked. You now have the necessary key material to send mails with PGP encryption.]()
![If at the end in the settings your new PGP key is listed as well as its ID, the creation has worked. You now have the necessary key material to send mails with PGP encryption.]()
If at the end in the settings your new PGP key is listed as well as its ID, the creation has worked. You now have the necessary key material to send mails with PGP encryption. -
Requirement 3: Key exchange and verification
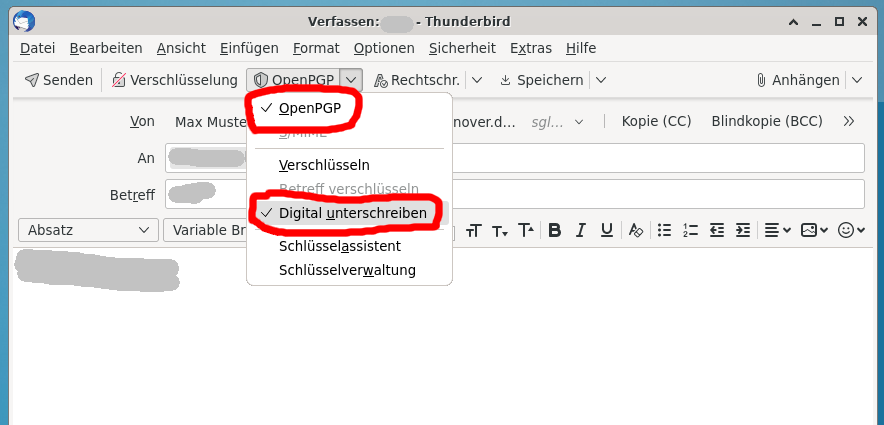
![The person (person B) with whom you want to communicate must forward the PGP key to you. Person B must send you an e-mail with "Sign digitally" selected under "OpenPGP". Under certain circumstances, the menu item is not called "OpenPGP" but "S/MIME". Then simply click on it and check "OpenPGP" to switch to the correct encryption method.]()
![The person (person B) with whom you want to communicate must forward the PGP key to you. Person B must send you an e-mail with "Sign digitally" selected under "OpenPGP". Under certain circumstances, the menu item is not called "OpenPGP" but "S/MIME". Then simply click on it and check "OpenPGP" to switch to the correct encryption method.]()
![The person (person B) with whom you want to communicate must forward the PGP key to you. Person B must send you an e-mail with "Sign digitally" selected under "OpenPGP". Under certain circumstances, the menu item is not called "OpenPGP" but "S/MIME". Then simply click on it and check "OpenPGP" to switch to the correct encryption method.]()
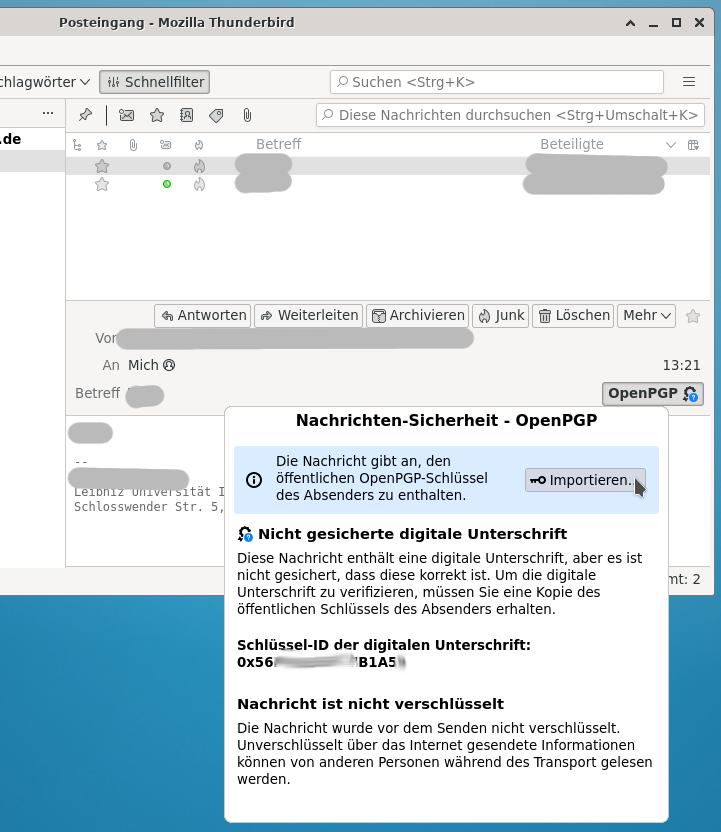
The person (person B) with whom you want to communicate must forward the PGP key to you. Person B must send you an e-mail with "Sign digitally" selected under "OpenPGP". Under certain circumstances, the menu item is not called "OpenPGP" but "S/MIME". Then simply click on it and check "OpenPGP" to switch to the correct encryption method. ![Once you have received the mail from person B, you will see a button in the bar above the mail display that says "OpenPGP" and has a seal icon next to it. Click on it and then on "Import...".]()
![Once you have received the mail from person B, you will see a button in the bar above the mail display that says "OpenPGP" and has a seal icon next to it. Click on it and then on "Import...".]()
![Once you have received the mail from person B, you will see a button in the bar above the mail display that says "OpenPGP" and has a seal icon next to it. Click on it and then on "Import...".]()
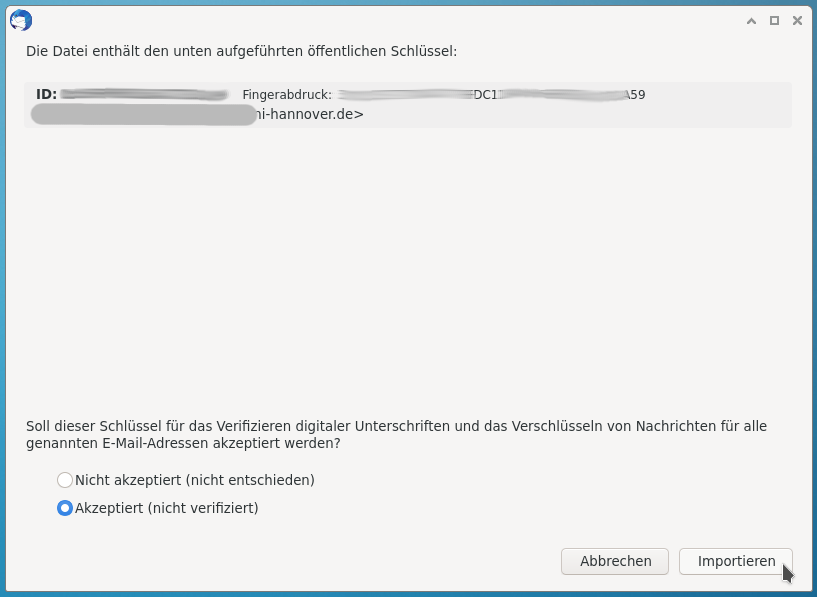
Once you have received the mail from person B, you will see a button in the bar above the mail display that says "OpenPGP" and has a seal icon next to it. Click on it and then on "Import...". ![In the subsequent window, select "Accepted (unverified)" and click "Import".]()
![In the subsequent window, select "Accepted (unverified)" and click "Import".]()
![In the subsequent window, select "Accepted (unverified)" and click "Import".]()
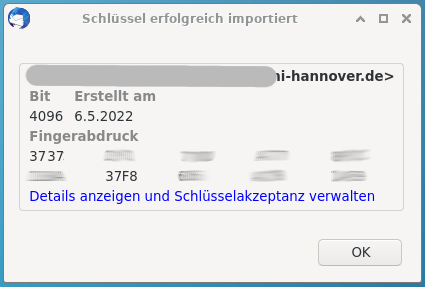
In the subsequent window, select "Accepted (unverified)" and click "Import". ![Now a success message is displayed together with the fingerprint of person B's key. This must be checked to ensure that this key actually comes from person B. To do this, click on "View details and manage key acceptance".]()
![Now a success message is displayed together with the fingerprint of person B's key. This must be checked to ensure that this key actually comes from person B. To do this, click on "View details and manage key acceptance".]()
![Now a success message is displayed together with the fingerprint of person B's key. This must be checked to ensure that this key actually comes from person B. To do this, click on "View details and manage key acceptance".]()
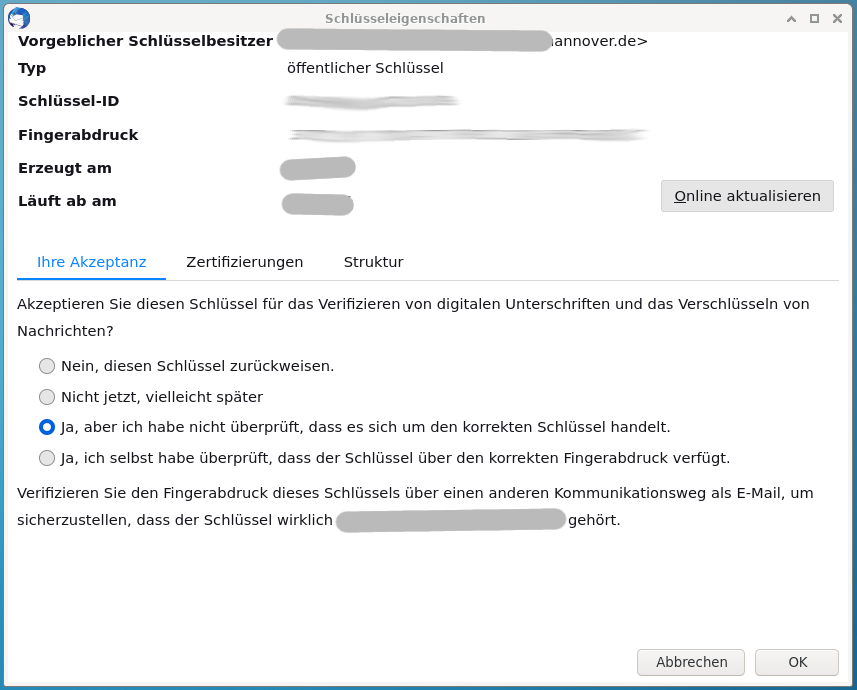
Now a success message is displayed together with the fingerprint of person B's key. This must be checked to ensure that this key actually comes from person B. To do this, click on "View details and manage key acceptance". ![Ask person B to send you the fingerprint of their key via an alternative communication channel (not email). The instructions for doing this are here with on this page. When you have compared the fingerprint and it matches, click on "Yes, I myself have Verified that the key has the correct fingerprint." and confirm this with OK.]()
![Ask person B to send you the fingerprint of their key via an alternative communication channel (not email). The instructions for doing this are here with on this page. When you have compared the fingerprint and it matches, click on "Yes, I myself have Verified that the key has the correct fingerprint." and confirm this with OK.]()
![Ask person B to send you the fingerprint of their key via an alternative communication channel (not email). The instructions for doing this are here with on this page. When you have compared the fingerprint and it matches, click on "Yes, I myself have Verified that the key has the correct fingerprint." and confirm this with OK.]()
Ask person B to send you the fingerprint of their key via an alternative communication channel (not email). The instructions for doing this are here with on this page. When you have compared the fingerprint and it matches, click on "Yes, I myself have Verified that the key has the correct fingerprint." and confirm this with OK. -
Display the fingerprint of your own key
![Select the top row of your account and then click "End-to-end encryption".]()
![Select the top row of your account and then click "End-to-end encryption".]()
![Select the top row of your account and then click "End-to-end encryption".]()
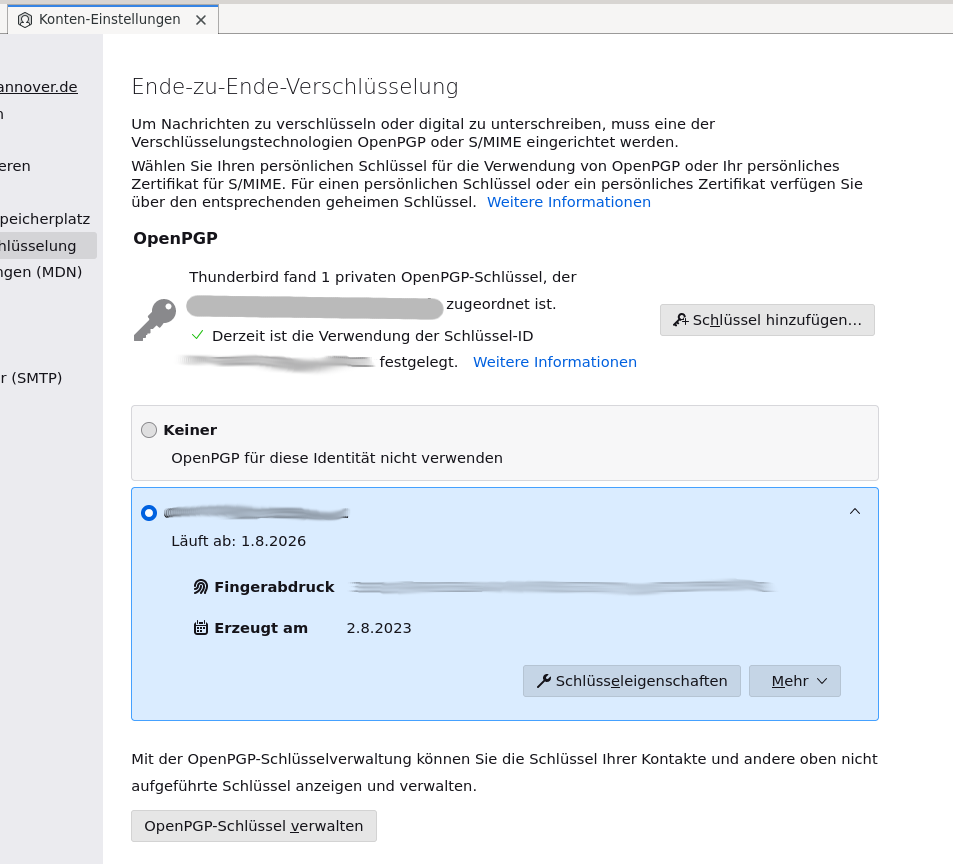
Select the top row of your account and then click "End-to-end encryption". ![Click on the small check mark in the upper right corner next to your current OpenPGP key.]()
![Click on the small check mark in the upper right corner next to your current OpenPGP key.]()
![Click on the small check mark in the upper right corner next to your current OpenPGP key.]()
Click on the small check mark in the upper right corner next to your current OpenPGP key. ![The fingerprint is displayed in the area that is now expanded.]()
![The fingerprint is displayed in the area that is now expanded.]()
![The fingerprint is displayed in the area that is now expanded.]()
The fingerprint is displayed in the area that is now expanded. -
Send mail encrypted with PGP
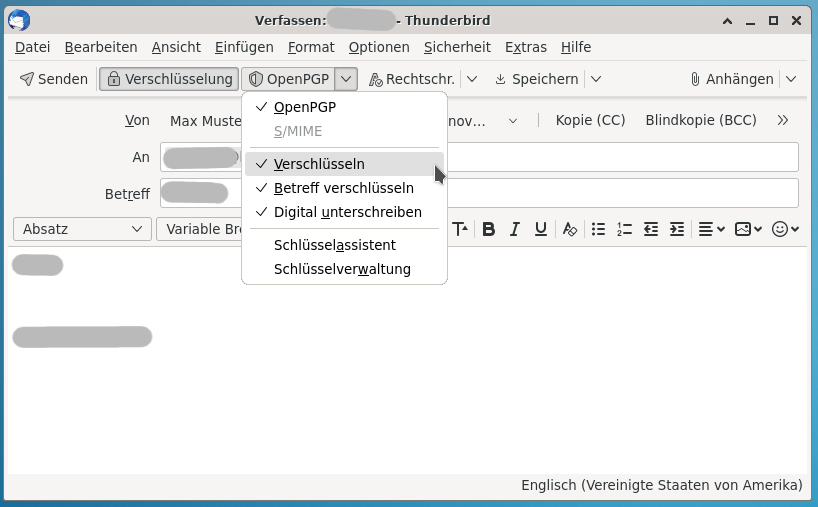
![Click on "OpenPGP" or "S/MIME" (depending on what is displayed) BEFORE sending your mail. Check "OpenPGP" there as well as "Encrypt". Also "Encrypt subject" and "Sign digitally" should be selected. After that you can send the email as usual and it will be transmitted encrypted.]()
![Click on "OpenPGP" or "S/MIME" (depending on what is displayed) BEFORE sending your mail. Check "OpenPGP" there as well as "Encrypt". Also "Encrypt subject" and "Sign digitally" should be selected. After that you can send the email as usual and it will be transmitted encrypted.]()
![Click on "OpenPGP" or "S/MIME" (depending on what is displayed) BEFORE sending your mail. Check "OpenPGP" there as well as "Encrypt". Also "Encrypt subject" and "Sign digitally" should be selected. After that you can send the email as usual and it will be transmitted encrypted.]()
Click on "OpenPGP" or "S/MIME" (depending on what is displayed) BEFORE sending your mail. Check "OpenPGP" there as well as "Encrypt". Also "Encrypt subject" and "Sign digitally" should be selected. After that you can send the email as usual and it will be transmitted encrypted.


Instructions: Using PGP with Outlook as an example
Contact
Hotline IT-Service-Desk
Office hours
The IT service desk is currently available by phone Monday to Friday 8:00 a.m. – 5:00 p.m.
Phone
Hotline IT-Service-Desk
Office hours
The IT service desk is currently available by phone Monday to Friday 8:00 a.m. – 5:00 p.m.
Phone